
What is Foil Stamping?
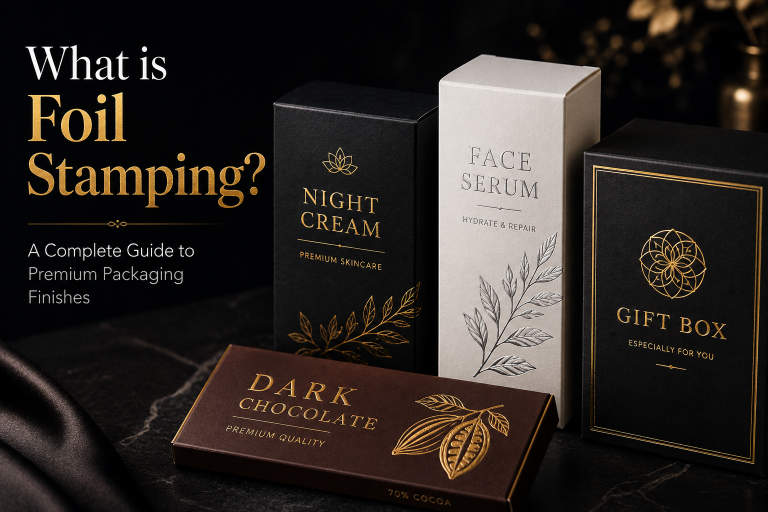
In the world of packaging finishing, foil stamping is a technique that applies thin metallic or colored foil to packaging surfaces, creating shiny, eye-catching designs. Modern foil finishes use several methods: hot foil stamping, cold foil stamping, digital foil stamping, and foil embossing. Each method has its own workflow and use case. Hot stamping uses a heated metal die and pressure to transfer foil, yielding a deep metallic shine. Cold foil uses UV adhesives inline, ideal for fast, large print runs. Digital foil requires no metal dies and enables on-demand, personalized foil effects. Foil embossing combines metal foil with embossing for a raised metallic effect. These methods are widely used in premium packaging and luxury packaging to boost brand appeal. This blog explains each method in detail (definition, steps, advantages, drawbacks), along with common foil types (metallic, holographic, etc.), cost factors (dies, setup, run length), material considerations, and design tips. A summary comparison table and a decision flowchart help pick the right technique for a given project.
Foil stamping adds a metallic or pigmented layer to paper, board, plastic or other substrates. It is used on product cartons, labels, invitations, and more to give a luxury finish. The foil comes on a carrier film and transfers to the target surface either by heat and pressure (hot foil) or by adhesive (cold foil). The result is a brilliant decoration – often gold, silver, or multi-colored – that draws the eye on a retail shelf.
Major Foil Stamping Methods
Hot Foil Stamping
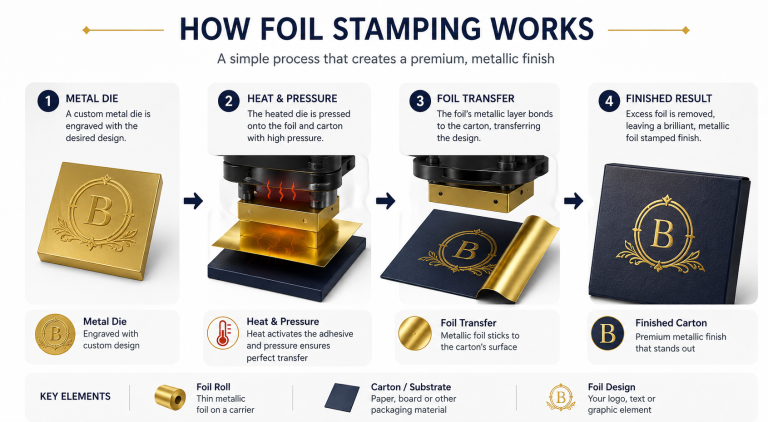
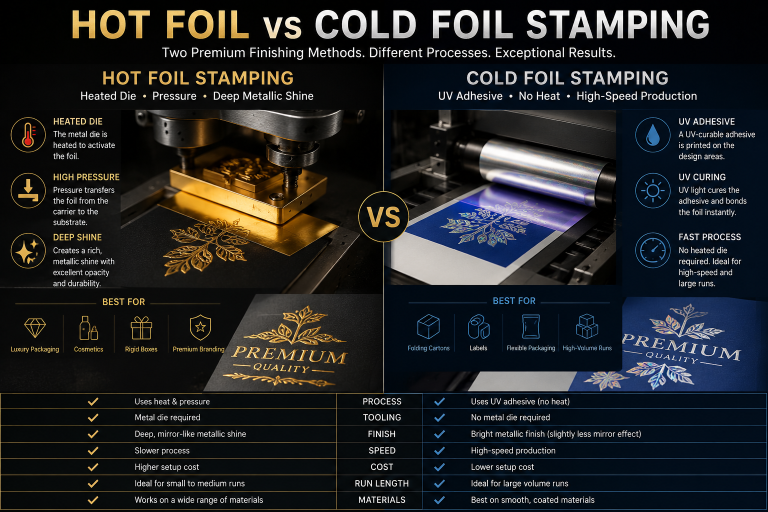
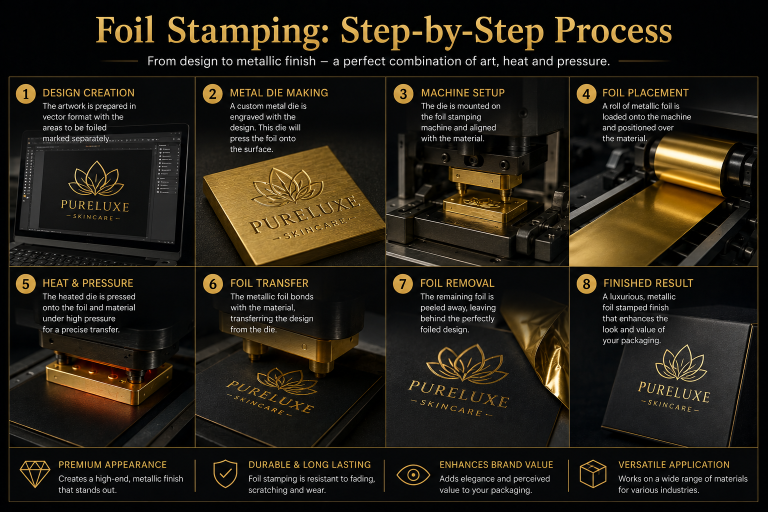
Hot foil stamping is the classic foil stamping process. A custom metal die (often brass or magnesium) is etched with the desired design. During production, the die is heated and pressed firmly onto the foil film laid over the substrate. Heat and pressure activate an adhesive layer on the foil, causing the metal layer to bond to the material. After the die lifts, any excess foil film is peeled away, leaving the foil design on the surface.
- How it works: 1) Engrave design into a metal die. 2) Mount and heat the die on a stamping press. 3) Position foil sheet on the substrate. 4) Press the heated die against it, transferring the foil. 5) Remove unused foil film.
- Advantages: Produces a very bright, mirror-like metallic finish that resists fading. Creates a subtle deboss (indentation) behind the foil, adding texture. Works on thick or textured materials. Versatile decorative foils (gold, silver, copper, colored metals) are available.
- Limitations: Requires expensive metal dies and longer setup time. Lower production speed (often done offline). Not suited for tiny text or photographic gradients. The per-unit cost is high for very short runs due to tooling.
- Best for: Luxury gift packaging, cosmetics boxes, rigid boxes, and any application where a classic gold foil or silver foil shine is desired to signal quality.
Cold Foil Stamping
Cold foil stamping (or cold foil printing) is a newer process that does not use heat. Instead, it is done inline on a printing press. First, a UV-sensitive adhesive is printed onto the surface in the shape of the design. A roll of foil (usually aluminum-based) is then laminated over the wet adhesive. UV lamps quickly cure the adhesive, bonding the foil to the printed areas. Finally, the foil film is removed, leaving foil only where glue was applied.
- How it works: 1) Print a UV-curable adhesive pattern on the substrate using a flexo or offset press. 2) Laminate a thin metallic foil over the sheet. 3) Use UV light to cure the adhesive, fixing the foil to the design. 4) Peel away the non-adhered foil.
- Advantages: Very fast for high-volume runs (foil application happens during regular printing). No heated die needed, so tooling cost is lower. Excellent for fine details, gradients, and large solid foil areas. Ideal for multiple foil colors by running different foil rolls. Works on sensitive or thin substrates (light cartons). Precise registration since foil exactly overlays printed glue.
- Limitations: The final metallic effect is bright but typically slightly less “mirror” than hot stamping. Cold foil can be delicate – it may scratch without a protective coating. It requires very smooth, flat surfaces and precise press calibration. The process adds equipment complexity (UV curing stage).
- Best for: Labels, flexible packaging, food and beverage cartons, and other applications needing fast turnarounds and large quantities. Common in FMCG (fast-moving consumer goods) like cereal boxes, where expansive foil graphics attract attention.
Digital Foil Stamping
Digital foil stamping (sometimes called on-demand foiling or foil sleeking) uses digital printing technologies instead of traditional dies. In one approach, a digital printer or copier prints a special toner or clear varnish only where foil is desired. Then a sheet-fed laminator applies foil over the design; the foil only bonds to the toner/varnish under heat. Another approach uses dedicated digital finishing machines that apply and fuse foil with programmable settings.
- How it works: 1) Print the design with a foil-reactive toner or UV-curable base on a digital press. 2) Place foil film on top and run through a laminator or digital foil unit that heats or activates the foil onto printed areas. 3) Remove excess foil film. (Alternatively, some digital presses with foil modules may apply foil directly without a separate lamination step.)
- Advantages: No metal dies are required, so setup is quick and inexpensive. Excellent for short runs, prototypes, and customization (variable data, personalization). Can handle multiple foil colors easily by repeating the process. Compatible with short-run digital print workflows. Great for very elaborate or changing graphics since files can be updated instantly.
- Limitations: Sheet-by-sheet process can be slower than web presses for huge volumes. Requires specific digital foil equipment or laminators. Not all materials may work. The per-item cost is higher on large runs compared to cold foil.
- Best for: Personalized packaging, limited-edition products, small-batch premium packaging, or any application where quick turnaround and unique elements are valued. Designers can do variable names or codes in foil, which is impossible with fixed dies.
Foil Embossing (Combination Embossing)
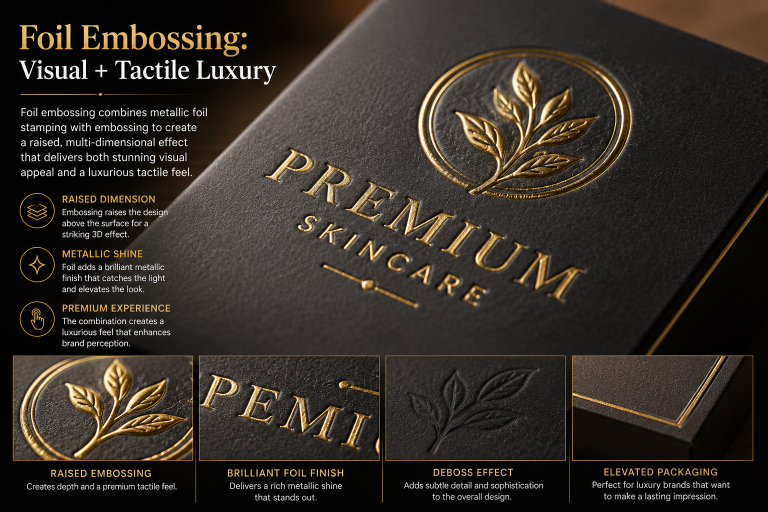
Foil embossing merges foil stamping with embossing in a single step. Special matched dies (a male and female die set) are made. When the press runs, the male die pushes the paper up while the female die applies foil and pressure from above. The result is a raised (embossed) design coated in foil, all perfectly aligned.
- How it works: During a single press pass, the heated die transfers foil and simultaneously embosses the shape. This means the foil is applied only to the areas that are raised. The dies guarantee perfect registration between the metallic finish and the embossed detail.
- Advantages: Creates an extremely premium, tactile effect – a raised foil logo or pattern that catches light from many angles. By combining techniques, it magnifies visual impact. The raised foil invites touch, elevating perceived quality. It also eliminates misregistration issues that occur when embossing and foiling separately.
- Limitations: Very high cost and complexity. Both foil stamp and emboss dies must be made. Production speed is slower and stock must be thick or coated to handle embossing. Usually reserved for top-tier luxury applications.
- Best for: Ultra-high-end products – think luxury perfume boxes, fine jewelry packaging, etc. This is the “wow” effect for brand logos and special editions, boosting brand perception to the highest level.
Comparison of Foil Stamping Methods
Method | Process Summary | Advantages | Limitations | Best For |
Hot Foil Stamping | Uses a heated metal die to press foil onto the material. | Vivid, mirror-like metallic shine; durable; slight deboss texture. | High setup cost (dies); slower setup; no gradients. | Luxury packaging, cosmetics, stationery. |
Cold Foil Stamping | UV glue printed on press, foil laminated and UV-cured inline. | Fast for large runs; no die needed; fine detail; cost-effective at scale. | Slightly less reflective; needs very flat surfaces and precise registration. | Labels, food/beverage cartons, large-volume products. |
Digital Foil Stamping | Digital press or lamination applies foil without dies. | No tooling cost; variable data/personalization; quick short runs. | Requires special digital equipment; slower sheet-fed; higher unit cost on large runs. | Personalized packaging, limited editions, business cards. |
Foil Embossing | Hot foil stamping with an embossing die in one pass. | Ultra-premium 3D metallic effect; perfect alignment; highly tactile. | Very high tooling cost; limited speed; needs heavy stock. | High-end luxury packaging, premium labels, awards. |
Common Foil Types and Visual Effects
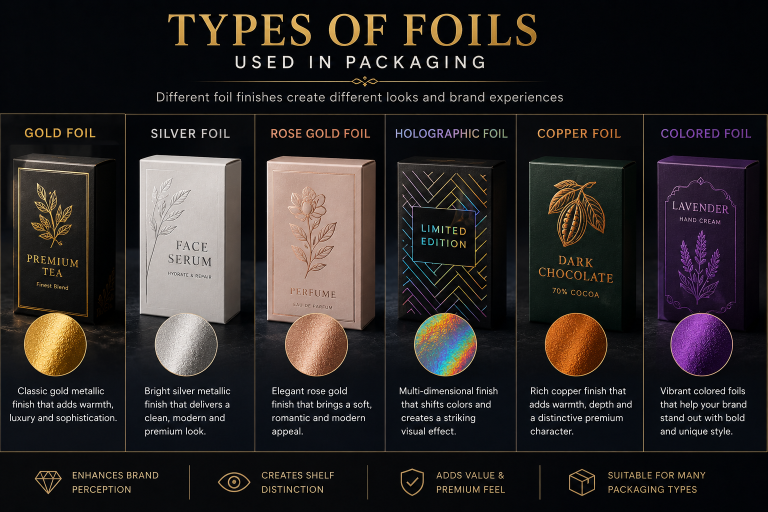
Foil stamping isn’t limited to plain gold or silver. Designers can choose from many foil varieties:
- Metallic Foil: The most common choice – polished gold, silver, copper, brass, or other metallic colors. These give a classic reflective finish. For example, a gold foil logo on a dark box screams luxury at a glance.
- Holographic Foil: Foils with micro-lens patterns that create rainbow, prismatic, or 3D illusions when light hits them. Often seen on high-value packaging and security labels. They produce dazzling color shifts and depth, great for tech products, toys, or brand-protection uses.
- Pigment/Colored Foils: These have vibrant matte or glossy colors (red, blue, black, white, etc.) instead of metal. They add color with a smooth finish and no mirror shine. Useful for bold brand colors that need a premium feel without sparkle.
- Pearlescent Foil: A pearlized finish foil that looks like mother-of-pearl. Gives a soft shimmer, popular in cosmetics and wedding stationery.
- Gloss/Transparent Foil: Clear foil layers that can act like a super-glossy coating on printed color (often called “clear gloss foil” or “varnish foil”). Creates a super shiny spot-coating effect.
- Textured & Patterned Foils: Foils embossed with designs (geometric patterns, linen texture, leather print, etc.) or engineered foils (like diffraction foils). These add unique textures or visual interest.
- Security/Scratch-off Foils: Special types where a hidden code or layer is revealed by scratching away the foil. Used in promotions or authentication.
Each foil type creates a distinct look: from mirror shine to subtle matte, from color shifting to rich solid hue. Choosing the right foil involves balancing visual impact with brand style.
Use Cases and Industry Examples
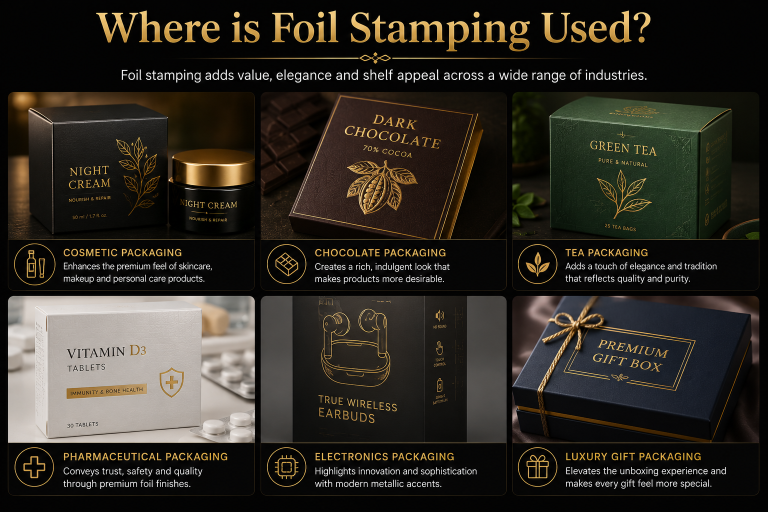
Foil stamping is widely used across industries:
- Cosmetics & Beauty: High-end makeup and perfume boxes frequently use gold/silver foil logos to convey elegance. Many luxury skincare products have foil-stamped labels.
- Food & Confectionery: Premium chocolates, wines, and specialty teas often feature foil elements for a luxurious feel. Beverage cartons and labels use foil to catch the eye (think golden accents on wine boxes).
- Fashion & Accessories: Shoe boxes, apparel tags, and luxury gift bags often get foil stamping or foil embossing for a high-end vibe.
- Technology & Electronics: Tech packaging (high-end headphones, smartphones) can include subtle foil accents to signal quality. Holographic foils add a modern, dynamic look.
- Pharma & Healthcare: Some pharmaceutical packaging uses foil for tamper-evident seals, brand enhancement, or secure coding on boxes and labels.
- Labels & Promotions: Craft beer labels, small-batch products, and promotional prints often use foil for impact. Cold foil is common on magazine covers and catalogs for colorful foil effects.
Illustrative Example: A boutique tea brand might package its product in a dark emerald green box. The brand name and a leaf pattern could be foil stamped in bright copper foil. In the shop, the shimmering copper catches the eye, suggesting a premium, carefully crafted product inside.
Foil Stamping vs. Spot UV vs. Embossing
A quick comparison of three popular finishing techniques:
Finish Type | Visual Impact | Texture | Metallic Effect | Cost Level |
Foil Stamping | Very High (shiny metallic or holographic effect) | Smooth or slightly raised (if die is embossed) | Yes (gold, silver, colored metals, holographic) | High (due to custom dies and process) |
Spot UV | High (glossy contrast on matte) | Glossy smooth relief | No (clear gloss only) | Medium (screen-print UV with setup costs) |
Embossing | Medium/High (3D texture, no color change) | Raised (emboss) or recessed (deboss) | No | Medium (metal die cost, but lower than foil) |
- Foil Stamping adds metallic shine and optional emboss (if die is raised), making it visually dramatic.
- Spot UV adds glossy highlights (clear resin) on top of printed areas, creating a mirror-like contrast, but it does not change color or add metal sheen. It’s great for subtle highlights.
- Embossing (and Debossing) create tactile 3D effects by pressing into the paper. Alone, embossing doesn’t add color or gloss (though it can be combined with foil for a “foil emboss” effect).
Use foil when you need reflective, metallic shine. Use Spot UV for high-contrast gloss on selected areas. Use embossing for a textural element. You can combine these (e.g. foil + emboss together is common in high-end packaging) for maximum impact.
Design Tips and Best Practices
To make the most of foil stamping:
- Keep Designs Bold and Simple: Use thicker lines and avoid extremely small text. Very fine details risk not transferring cleanly. For example, a logo in foil should be simplified if it has intricate thin lines.
- High Contrast: Choose foil colors that contrast well with your background. Metallic gold or white foil looks stunning on dark papers, while darker foils (black, blue) can work on light papers. Holographic foil works on many colors but shows best on darker backgrounds.
- Smooth Paper Stock: For crisp results, pick a smooth, heavyweight stock. Cotton or uncoated papers often give sharp, even foil transfers. If you want texture, test it early — some designs use the textured look intentionally.
- Separate Layers for Printing: If combining foil and ink (or embossing), organize your artwork in layers. Designers should separate foil elements from ink elements so the printer can make appropriate dies and plates.
- Test on Material: Always order a proof or prototype. Different foils and papers interact uniquely. A test run will catch issues (like paper discoloring or foil gaps) before full production.
- Use Foil Strategically: Foil stamping is best for highlighting key elements—think logos, headlines, key graphics, or accents. Don’t overuse it everywhere, or it loses impact. A small foil logo or border can be more elegant than covering an entire panel in foil.
- Combine Techniques: Foil with embossing (for foiled emboss effects) can be especially luxurious. For example, an embossed logo with foil on top becomes raised and shiny. Conversely, a debossed (indented) shape with foil can give a subtle concave-metallic look.
- Select Foil Colors Thoughtfully: Metallic gold/silver/rose gold evoke luxury and tradition, while colored foils (like blue, red) or holographic foils can feel modern and playful. Match the foil’s emotional effect to your brand. (Tip: foil colors should harmonize with your printed or brand palette.)
Conclusion
Foil stamping is a time-tested way to elevate branding and packaging from ordinary to outstanding. By adding a metallic finish—whether gold, silver, holographic or a bold color—foil stamping attracts the eye, conveys quality, and creates an unforgettable unboxing experience. It’s a strategic design tool as much as a decorative one: the right foil accent can signal luxury, highlight key information, and make your product speak before a customer even reads the first word.
For designers and brand managers, foil stamping offers a rich palette of options. Combine it with embossing for ultimate tactile luxury, or pair it with crisp design to let the foil shine. While it carries higher setup costs than simple printing, the premium perception and shelf impact often justify the investment, especially for luxury, beauty, food, and tech products.
Foil stamping is a powerful way to make your brand shine—literally. Use it well, and your product won’t just be seen, it will be remembered.